How To Stop Windows 10 Update Automatically On Windows 10

07:01 Add Comment
If you want to prevent Windows 10 from downloading updates automatically, i’ll show you how to do it.

A lot of software nowadays is updated automatically, including web programs and the working system on Google Chromebooks. They're a larger number of administrations than software, and in spite of the fact that Windows has dependably had genuinely normal updates, Windows 10 has been disagreeable with users because Microsoft truly forced those updates out and restarted PCs regardless of the possibility that you were really busy something. 

Things are better now on account of a component called Active hours that gives you a chance to set a timeframe every when Windows won't restart. We'll additionally disclose how to use this. 

Windows 10 Home users can't concede updates like Pro users, yet nobody can put them off perpetually, and nor should they. Bounty contain critical security fixes and bug fixes. 

How to stop Windows 10 automatically downloading updates 

One approach to stop updates being downloaded is to set your web association as 'metered'. This is a typical thing on phones, where you wouldn't need application updates gobbling up every one of your information recompense. Also, you can do a similar thing in Windows 10. 

To do this, open the Windows 10 Settings (the pinion symbol on the Start menu) and snap Network and Intenet.


Click on Wi-Fi in the left-hand menu, then click on the network to which your laptop, tablet or PC is connected (sadly, you can’t do this for wired Ethernet connections).


Scroll down and you’ll see the option for Metered connection, and below it the switch to turn it on.


This will reduce data usage and stop Windows updates from being downloaded.

Normally, this will likewise keep them from being introduced, which means it's a finesse approach to concede updates in the event that you have Windows 10 Home, which most home users do. 

Since this setting is made per wireless network, you can pick whether to permit updates to download on a few networks and not others – you may even discover the setting useful on the off chance that you tie your phone or tablet to your laptop. 


These settings are altogether remembered by Windows, so once you've set them up the tenets will then automatically apply each time you interface with that network. In the event that you ever need to return to your ordinary state, then simply kill the Metered connection option.

How to prevent Windows 10 restarting when updates are installed

If you haven’t done already, it’s well worth setting up Active hours. In the Settings app choose Update & security, then scroll down and click ‘Change active hours’.


Between the hours you choose, Windows won’t automatically restart. And even outside those hours, it will check to see if you’re using your computer and warn you of the impending shut down.


Windows 10 Professional Edition: Defer upgrades


While Home users are stuck with having to working around automatic updates, Professional users have an inherent option that permits them to concede updates for a while. The best some portion of this option is that security patches are still connected, it's simply system updates that are kept down.


To enable the feature go to the Start Menu and type Settings, then select the top option. From Settings go to Advanced Options and there you’ll find the Defer Upgrades tick box under the Choose How Updates are Installed section. Click on this and you won’t have to worry about updates for a while.


How To Reset Network Settings In Windows

20:49 Add Comment
On the off chance that you can't associate with the web on your PC or portable workstation, here's the means by which to reset organize settings in Windows. 

First, however, attempt and set up where the blame untruths. Will different devices in the house get on the web? Can you stack sites by means of an alternate web program? On the off chance that the response to both is no, odds are your broadband association is down, or the switch needs resetting. Have a go at controlling off your switch and restarting it a moment later. For additional, perceive How to settle broadband association issues 

In the event that the issue is by all accounts constrained to Internet Explorer, it may be the case that an intermediary server has been set - possibly without your insight. We disclose independently how to change intermediary settings in IE 

Then again, it could be a product or equipment issue with your PC's system connector. Regularly, restarting your PC will settle this, however you can likewise ensure Windows is completely avant-garde by opening the Control Panel from the Start Menu and looking for 'Windows Update'. 

How To Reset Network Settings In Windows 10


In the event that you have Windows 10, open the new Settings application by tapping the machine gear-piece symbol on the Start menu. Tap on Network and web. It ought to open on the Status page, yet in the event that not, click Status at the highest point of the menu in the left-hand sheet. 


Scroll down on the right until you see Network reset. Click this and you'll see a button to 'Reset now'.


In other versions of Windows, you can open the Control Panel from the Start menu, go to Network and Internet and then Network Connections. You'll see something like this:


Select the appropriate adaptor - Ethernet if you have a network cable connected to your computer or Wi-Fi if you usually connect to your router wirelessly - and right-click on it. Click Disable. Then double-click on it to enable it again. This often fixes connection problems, but you can also select a connection and hit the Delete key on your keyboard to remove it. 
To reinstall it, go to Device Manager in the Control Panel and press the 'Scan for hardware changes' icon - circled below - to find it and Windows should automatically install its drivers.


How to forget Wi-Fi networks in Windows 8 and 10
If the problem is that your computer keeps connecting to the wrong Wi-Fi network, here's how to make Windows forget them.

Windows 10


Step 1. From the Start menu, click the cog icon to open the Settings app.

Step 2. Click on Network & internet, then click on Wi-Fi in the left-hand menu

Step 3. On the right, click on Manage known networks. 


Step 4. Click on the network you no longer want to use, and click the Forget button.

Windows 8


Step 1. Press the Windows key and C to bring up the Windows 8 Charms bar. Click Settings, then Change PC Settings.

Step 2. In the left-hand menu, click Network and then Manage known networks


Step 3. Click on a network name and then on the Forget button, and it will be gone from the list.


How to reset TCP/IP settings

There's also a way to reset Windows' TCP/IP settings if you have problems connecting to the internet from a particular laptop or PC. Microsoft has a downloadable 'Fix it' which you can get here.

How to reset internet settings in Windows

Step 1. Close all Internet Explorer and Windows Explorer windows.

Step 2. Launch Internet Explorer and click on the cog icon in the top-right corner. Then choose Internet Options.

Step 3. On the Advanced tab, click Reset. A new window will appear explaining everything that will erased by continuing. If you tick the 'Delete personal settings' box, it will remove browsing history, cached files, and reset your home page(s).


Step 4. Restart your computer when IE has finished restoring the settings. If you get an error message when you try to reset, you can open Task Manager and look through the processes list and kill off all other Internet Explorer processes. If you don't know how to do that, it's easier to restart your PC, launch IE and repeat steps 1-3.

Nokia 3310 Modern Will Soon Released! The Legend Is Back!

07:02 Add Comment

Hello and welcome to Char Note. It's very likely that the Nokia 3310 is set to make a fantastic comeback. As indicated by a trustworthy source, an advanced rendition of the exemplary phone will be divulged before the finish of the month. What's more, it will be sufficiently shoddy that you might need to get one for simply nostalgic reasons. 

HMD Global Oy, the Finnish producer which now showcases phones under the Nokia brand, is set to report a modest bunch of new handsets at the Mobile World Congress (MWC) on February 26. This is as per Evan Blass, a famous tipster and leaker also called @evleaks. 

Composing for VentureBeat, Blass claims that the vast majority of these phones will be customary ol' Android Nougat handsets. The Nokia 6 will apparently brag a 5.5-inch show, 4GB of RAM, and a 16MP camera, the Nokia 5 will have a 5.4-inch show, 2GB of RAM, and a 12MP camera, and the Nokia 3 will… be for individuals on a financial plan. 

In any case, and the lowland standard Androids, HMD is set to dispatch a current rendition of the exemplary Nokia 3310. The 3310 was basically indestructible and had a battery life present day smartphones can just dream of. Which is the reason the 3310 is the phone the greater part of us most firmly connect with the Nokia brand right up 'til today. 

The Ultimate Weapon Against Zombies 

The first Nokia 3310 was ended in 2005, yet is still discussed with love. The new form will supposedly be a "tribute" to the first 3310, conveying it up and coming to present day include phone gauges while keeping up its center elements. Which most likely incorporates Snake. 

The new Nokia 3310 is supposed to be evaluated at just €59 (US$62). This ought to be sufficiently shoddy to guarantee a few people get one for absolutely nostalgic reasons. Also, if wistfulness isn't reason enough, the Nokia 3310 is conceivably a definitive weapon to battle off the undead in case of a zombie end of the world. No, truly. 

This must be delegated gossip for now, however given Blass' reputation on these things we'll be more shocked if another variant of the Nokia 3310 doesn't presently show up at MWC. Suffice to state both Nokia and HMD are refusing to affirm or deny the bits of gossip.

How To Remove Cortana On Your PC

20:35 Add Comment

Hello and welcome to Char Note. Microsoft's own right hand for Windows 10, out of his PC unequivocally. He's presumably not the only one, so I figured I'd detail precisely how to play out a Cortana-ectomy. 

This methodology was done on the most recent form of Windows 10, which is 1607 (the Anniversary Update). Once entire you'll have a customary pursuit bar like in past forms of Windows. 


Presently, before we start you may as of now be having second musings. You may think, "Hang on a second. I don't need Cortana keeping an eye on me, yet I additionally would prefer not to go messing about in my PC. 

The first route is for individuals who have Windows 10 Pro, Enterprise, or more. On the off chance that you have Windows 10 Home I'll cover it beneath. 

To close down Cortana in Windows 10 Pro essentially sort gpedit.msc in the hunt box to open the Group Policy Editor. Navigate to Local Computer Policy > Computer Configuration > Administrative Templates > Windows Components > Search. Double-click the policy named Allow Cortana.


At the point when the policy window appears just click Disable. You’re done!


If you're using Windows 10 Home, you'll have to alter the registry. Try not to handle this step unless you have encounter altering the registry. Also, you ought to set a restore point now on the off chance that things go sideways. To do that simply take after these tips. 

It bears rehashing: This is risky. All things considered, this is what you do. Sort Regedit into the hunt confine Windows, and open the Registry Editor.

Navigate to HKEY_LOCAL_MACHINE\SOFTWARE\Policies\Microsoft\Windows\Windows Search. 

Here’s where it gets tricky: That final key (Windows Search) might not be present, as it wasn’t on my machine. In that case you’ll need to right-click the Windows directory and select New > Key. Name it Windows Search.


Presently select that new key. In the righthand sheet, right-click and select new DWORD and name it AllowCortana. At that point right-click that value and ensure it's set to 0. 


Sign out, sign back in and you should notice that Cortana has been replaced with a generic search box and yeahhh!

One final note: After this is done, it's conceivable that you'll look in the Task Manager and discover Cortana as yet staying there, taunting you. Travis revealed to me he could murder the procedure. When I attempted it myself it was troublesome, as well as once I did I couldn't look at all on my PC, for anything. Plainly Cortana is an intense treat. She just devours 39MB, so consider whether she's more inconvenience to execute than she's worth.

This Is 6 Essential Tips for First-Time PC Builders

19:57 1 Comment
Hello and welcome to Char Note. Building a PC is the most ideal approach to get the ideal machine for your necessities. We've demonstrated to you the fundamental steps before and additionally some different tips, however there are sure things the vast majority of us learn subsequent to messing up and squandering a ton of time. Here are a couple of things you can gain from veterans' mix-ups. 

Obviously, on the off chance that you've fabricated maybe a couple PCs some time recently, you may at present discover a few chunks of information in here you hadn't found all alone, so look at the video above for a brisk diagram, and look at the tips beneath for more subtle elements. Furthermore, bear in mind to share your own, as well! 

1. Test Before You Build 


Getting a section that is dead on landing is uncommon, however it happens—one take a gander at audits on Newegg will reveal to you that. The exact opposite thing you need to do is spend a day building your PC just to connect it to and have a DOA motherboard. Gratefully, your motherboard's case makes a flawless test seat: put your motherboard on top of its container, introduce your CPU, RAM, CPU cooler, and video card (if material), connect to your energy supply's 24-stick and 8-stick control links, attach it to a screen, and fire it up (which you can do using your motherboard's energy catch, in the event that it has one or a screwdriver). In the event that you can at any rate get into the BIOS, you'll in any event know nothing's dead. From that point, simply put your for the most part incorporated motherboard with your case, fasten everything, and connect your fans, case headers, and different adornments. It won't add especially time to your assemble, yet it'll spare you a ton of time on the off chance that you get a dead segment. 

2. Try Not To Overdo Your Thermal Paste 


It's a senseless little step, however it's something individuals always contend about on the web: what's the most ideal approach to apply warm glue? I've seen individuals do some entirely insane things, similar to put on a goliath blob or spread it around with a charge card, when it truly couldn't be easier. Simply put a little, pea-sized spot in the center (lentil-sized, truly), or a thin line about the span of a grain of rice. At that point put your heatsink on and begin sinking it. The weight will spread it out for you. 

There are dependably special cases to this govern, as high-or low-thickness glues (like ones made with genuine silver). In any case, for the normal glue, the procedure truly is this straightforward. If at any point in uncertainty, simply check the directions that accompany your glue or take a gander at the producer's site. Truth be told, their site ought to likewise reveal to you which method (pea or rice) is best for your particular image. 

At last, your application method shouldn't have an immense effect unless you're using truly particular, costly warm glue—which, coincidentally, most likely won't have a tremendous effect in your temperatures. Simply don't use a lot of and you'll be fine. In the event that you need more data, this article at Tom's Hardware has all you have to know. 

3. Plan Before You Build 


Each form is distinctive, and hopping in too rapidly may mean you overlook something vital and wind up taking it separated and begin sans preparation. Thus, make a stride back for only a couple of minutes and plan your work out. Does your CPU cooler have a backplate? Append it to your motherboard before you screw your motherboard into the case. Is your representation card huge? Introduce your hard drives first, since it'll most likely square access to them. Does your energy supply impede access to your motherboard? You'll need to introduce it a while later, rather than before (however now and again the turn around is valid). It sounds senseless, yet a little representation can make things a considerable measure less demanding and less tedious. 

4. Make Good Airflow 


I don't have to disclose to you that a hot, dusty PC is awful—yet a considerable measure of manufacturers don't put an excess of thought into their fans the first run through around. Focus on which bearings your fans are confronting (they ought to have a bolt as an afterthought that discloses to you which way it blows air), and attempt to get the air streaming across the board heading—as a rule in the front of the case, and out the back. You likewise most likely need more admission fans than fumes fans to make positive gaseous tension inside your case. On the off chance that you have more admission weight, then any additional air will escape through the niches and corners of your case, rather than entering through those alcoves and crevices (and hence acquiring more clean). Positive pneumatic stress combined with channels on your admission fans implies you'll have substantially less clean, which implies cooler and calmer operation. 

5. Skip the Driver Disks 


Odds are, your motherboard, video card, and different segments accompanied a CD or DVD loaded with drivers and other programming. For the most part, we prescribe skirting these. When you assemble your PC, the drivers are likely obsolete, and the circles regularly accompany other programming that you presumably don't need. 

There is one special case to this govern, and that is Ethernet or Wi-Fi drivers. In the event that Windows doesn't have your drivers worked in, you clearly can't get to the web to download the most recent ones, so those circles can bail you out. On the other hand, you can use another PC to download the drivers to a glimmer drive and exchange them over. 

6. Save Your Boxes and Bags! 


Finally, when you're set building, don't toss out those containers or against static sacks! They can come in truly helpful when offering your parts down the line (because yes, you can offer old PC parts!). Besides, I've found that the motherboard box is the ideal place to store all the additional links, screws, sections, and different parts that you don't use. Try not to discard them, because you'll most likely need them if and when you redesign down the line. 

Clearly, this isn't a thorough rundown, yet these are a couple of the handiest tips we've learned following quite a while of building. In the event that you have your own, we'd love to hear them—and in case you're a veteran developer, make certain to send this along to your first-time manufacturer companions to spare them the inconvenience of taking in the most difficult way possible.

How To Stop an LCD Monitor from Flickering

22:12 1 Comment
Contrasted with more established showcases, LCD screens are a phenomenal minimal effort, low-power answer for our requirement for a PC show. Lamentably, some screen settings can make a LCD screen seem to flash. 

A gleaming LCD screen is more than only an inconvenience. It can cause eye strain, migraines, and a large group of different sicknesses, particularly on the off chance that you invest a lot of energy before your PC. Fortunately, there are a few steps you can take to stop the glinting and stay away from these issues. In this article, I'll demonstrate to you generally accepted methods to prevent your LCD screen from flashing. 


What Causes a LCD Monitor to Flicker ?

In spite of the fact that your PC screen may give off an impression of being a still picture when nobody is using it, it is really being overhauled continually. Much like a film strip is only a bundle of static pictures showed rapidly, your screen overhauls at a quick rate to make it look like things are moving easily on the screen. 

The rate at which your screen redesigns is measured in Hertz. One Hertz is equivalent to one cycle for every second. On the off chance that your screen is set to redesign at a rate of 100 Hertz, then it is reviving 100 times each second. The Hertz used to quantify screen revive rates is like the Gigahertz used to gauge the speed of your CPU, with the exception of that Gigahertz is a measure communicated in billions of cycles every second. 


On the off chance that the invigorate rate on your LCD screen is set too low, it can have all the earmarks of being flashing since there aren't sufficient overhauls every second. While a few people are OK with around 30 Hertz, others can see the gleaming and require a higher revive rate. The most widely recognized invigorate rate is 60 Hertz. 

There are different elements that can cause screen flashing and I have specified those at the base of this post. 

Setting the Refresh Rate for a LCD Monitor 

The revive rates that you can set for your LCD screen are generally dictated by the capacities of your screen. While some LCD screens can exploit a few diverse revive rates, others are bound to only maybe a couple. 

To pick another invigorate rate for your LCD screen in Windows, start by clicking on Start > Control Panel > Appearance and Personalization > Display. On the off chance that you are on Windows 8 or 10, without flaw click on the Start catch and pick Control Panel. In case you're in symbol see, you can click specifically on Display


On the left hand side of the window, click on Change Display Settings. 


Finally, click on Advanced Settings at the base right of the window. 


Click on the Monitor tab and you will see a couple of things. First, see the setting marked Screen Refresh Rate. This is the current revive rate for your LCD screen. Click the drop down menu and Windows will show the greater part of the invigorate rates workable for your screen. 

It is likely that your screen can just use maybe a couple invigorate rates, so this rundown may not be long. A few makers assemble screens that can show anywhere in the range of 30 Hertz to 200 Hertz. Typically, screens with higher revive rates will be more costly. A typical revive rate for gaming screens is 144 Hertz. On the off chance that the cost of a screen appears to be excessively shabby, making it impossible to you, it's likely because it has a low revive rate. For instance, some new 4K screens are shabby, yet are just 30 Hertz, which can make everything look rough on the screen. 

Likewise, a great deal of screens will demonstrate 59Hz and 60Hz and you can pick between the two. So what's the distinction? It's essentially something to do with adjusting and it truly doesn't make a difference. 


From here, you can attempt a higher invigorate rate and check whether the glimmering stops. Typically this does the trap. On the off chance that it doesn't work or there is just a single revive rate recorded, there are two things you can attempt. 

First, ensure you are using the most recent driver for your LCD screen. In the event that the driver is obsolete or Windows is using a bland driver, the quantity of invigorate rates accessible might be restricted. Visit the maker site and download the most recent driver for your rendition of Windows. 

In the event that that doesn't work, you can force Windows to use an invigorate rate that is not in fact bolstered by the screen. Be cautious, however, because it is conceivable to harm your screen equipment on the off chance that you do this. 

On the Monitor tab appeared above, there is an alternative that is checked naturally called Hide Modes That This Monitor Cannot Display. By unchecking this choice, you can force Windows to use any invigorate rate for your screen that you need. 

See that privilege underneath this choice, Windows cautions you around an unusable or harmed show. Uncheck this choice and set your screen to an unsupported invigorate rate at your own particular hazard. Contingent upon your variant of Windows, this choice might be turned gray out, which means you can just pick from the revive rates recorded in the crate. 

For Mac users running OS X, you can go to System Preferences and click on Display. Here you can change the revive rate for an outer show associated with your Mac.


Other Screen Flickering Causes 

In the event that changing the revive rate doesn't settle the gleam on the screen, it could be identified with different elements. Here is a rundown of different things you ought to check: 

Cable – If you can, change the link interfacing your screen to your PC. At times, an imperfect link can cause the flag to break while being transmitted over the wire. 

Input Port – Another arrangement is to use an alternate port on the screen, if conceivable. For instance, in the event that you are interfacing using HDMI, attempt DVI or DisplayPort or VGA rather and check whether that fixes the issue. 

Surroundings – notwithstanding equipment issues, electromagnetic fields can likewise cause screen glimmering issues. On the off chance that you have something else connected to a similar electrical extension like a radiator, fan, and so on., have a go at expelling it. 

Video card – If there is an issue with your video card, it will clearly impact the yield on the screen. Redesign the drivers and open your PC to guarantee that the video card is appropriately situated in the space. 

Hopefully – Lastly, the screen itself could be harmed or flawed. Have a go at interfacing the screen to another PC to check whether the issue leaves or remains. 

Ideally, this will help you make sense of what's causing the glimmering issues with your screen. On the off chance that you have any inquiries, don't hesitate to remark. Appreciate!

How To Use Deep Freeze To Restore Your PC On Boot

12:01 1 Comment
Ever wish you could fix every one of the progressions your children have made to your PC at home? Then again perhaps you might want to introduce some product on your system to test it before buying, however you don't know precisely what it will do to your system? 

Wouldn't it be pleasant on the off chance that you could simply restart your PC and every one of the progressions made were just wiped out? Fortunately, there is an approach to do this using a program called Deep Freeze by Faronics. 

Presently you would be correct on the off chance that you took a gander at that page and suspected this is a program that is used by huge organizations or foundations. Be that as it may, those are not their exclusive clients. They offer a standard version of the program for $45, which as I would like to think, is shabby considering the advantages. 

I've spent significantly more on programming and have regularly been disillusioned. That is the reason these days I just use freeware or buy membership programming like Office 365 and Adobe Creative Cloud. Be that as it may, this is one program I can suggest buying because there basically isn't a freeware that can do a similar thing in such an advantageous way. 


It's important that I have not been made a request to compose this audit by Faronics or anything like that. I got some answers concerning the program because the junior college where I am taking classes uses it and it works especially well. I chose to give it a shot on my test PC that I use for introducing programming when I compose surveys and it's made life a ton less demanding. 

Features and Benefits

Since I'm talking up the program so much, how about we go over what it does. Essentially, it makes it so that anything you do to your PC can be settled by simply rebooting the machine. Need to erase the whole System32 organizer? Pull out all the stops. Arbitrarily erase keys from your registry? Not an issue. Introduce malware and viruses on your system? It'll be pursued a reboot! 


The last point there about viruses raises one confinement of the Deep Freeze program. Essentially, it acts like a reset for your PC hard drive. When it reboots, it gets reloaded to the last solidified state. Whatever occurs in that time between reboots is a free for all. This implies an infection or worm introduced will be expelled on reboot, however it could cause harm to different systems until the following reboot happens. 

In professional workplaces or in establishments, the user records are additionally limited and the PCs are ordinarily forced to restart at any rate once per day. For home use, I'm the one using it, so I don't generally require that much control. In case I'm working with something I know is unsafe, I'll make a point to restart my PC promptly after.

What I like about the program is that you don’t have to spend any time trying to lock down your computer and you don’t have to spend any extra time recovering your computer. I’ve previously written articles on using system restore, backing up and restoring your registry, restoring your PC to factory settings, and even clean installing Windows 10, but they all require a lot of work plus more work reinstalling your programs, etc., etc.

Deep Freeze also has another state called Thawed. You can reboot the system into thawed mode, whereby you can install more programs, update settings, drivers, etc., and then refreeze the computer in the new state. It’s kind of like using a virtual machine, but not exactly the same thing. Virtual machines are great and I use them a lot, but setting them up can take time and requires a decent amount of technical knowledge.

Installation & Use

Using Deep Freeze requires pretty much no technical knowledge. What the program does is very technical, but the interface is bare-bones and very easy to use. I should also mention that the support is excellent. Since they have a lot of huge corporate clients, they have local staff available that speak great English. I had one issue after installation, which I’ll mention below, so I called and had a representative in less than 2 minutes.

Once you purchase the program and download the ZIP file, extract it and run the application. You should see the main install dialog.


Click Next and then accept the license agreement. After that, you’ll need to enter your license key that should be on the final purchase page and emailed to you.


On the accompanying screen, you'll pick which drive to design for profound solidifying. I have numerous hard drives in my PC, however I decided to simply stay with the C drive since that holds the working system. You can use it for information drives additionally in the event that you like. 


Next, you need to arrange the ThawSpace measure. This is a virtual segment that can be used to store information you need to hold regardless of the possibility that the system is solidified. I for one suggest unchecking the Create ThawSpace box because it just makes things all the more confusing. 


On the off chance that you need to hold anything like a record, it's best to spare that information to a drive or parcel that is not solidified. In the event that you just have one drive with one parcel, you ought to wipe out the introduce and segment your hard drive. On the off chance that you have a modest drive and insufficient space to parcel, then you can make the ThawSpace, which will appear as another drive when you are using Windows. 

The program will now be installed and the computer will reboot. You should see the Deep Freeze icon in the taskbar notification area. 


Presently this is where I needed to call client bolster. When I right-clicked or double tapped on the symbol, nothing happened. I couldn't make sense of it and the rep disclosed to me it's a security highlight. You should either hold down the SHIFT key and after that double tap or hold down CTRL + ALT + SHIFT and afterward press the F6 key. 

You'll see the watchword dialog fly up, however you can simply click OK since there is no secret word set after a new introduce. 


On the primary screen, you'll have to tap the Activate Now catch to enact the item. You'll additionally need to tap on the Password tab and sort in another secret word so that no one but you can get to the settings. 


On the Boot Control page, there are essentially only three alternatives, which makes using the program simple: Boot Frozen, Boot Thawed on next x restarts and Boot Thawed. Booting defrosted implies you'll have the capacity to roll out improvements to the system and they will be spared as opposed to expelled. 

I propose picking Boot Thawed, then restarting your PC and afterward introducing any Windows upgrades, programming, and so on. Commonly Windows doesn't finish a redesign in one boot, so you need to reboot a few circumstances. When you have finished every one of the upgrades, set it back to Boot Frozen and afterward restart.

The Reason Why You Have To Disable Your Webcam

21:03 2 Comments
Once a worry that was the area of the neurotic, years worth of reports and disclosures have made it promptly obvious that individuals truly can keep an eye on you through your webcam. Here's the reason you ought to disable or cover yours. 

TL;DR version: Script-kiddie programmers and youngsters can, and do, use effortlessly open instruments and phishing systems to commandeer webcams of clueless individuals, frequently who they know, and watch them through their camera. They can store pictures and recordings of individuals in trading off circumstances in their rooms, and a large number of these pictures and recordings are transferred to shady sites. 

On the off chance that you have children, you ought to emphatically consider perusing the total of this article and actualizing something to prevent their webcams from being on constantly (or ever). 


Is Webcam Spying Really a Threat? 

Ten years back the possibility that individuals—be they government specialists, programmers, or just law-breaking voyeurs—could effectively keep an eye on you through your PC's webcam would be the viewed as the ramblings of a suspicious intrigue scholar. A large number of news stories over the interceding years, in any case, have uncovered that what was once considered distrustfulness is currently an awkward reality. 

In 2009, an understudy sued his school when he found his school-if portable workstation was furtively capturing him (the resulting legitimate examination uncovered that the school had gathered 56,000 photos of understudies without their insight or assent). In 2013, scientists exhibited that they could initiate the webcam on MacBooks without the marker light turning on, something already viewed as incomprehensible. A previous FBI operator affirmed that in addition to the fact that this was conceivable that they'd been doing it for quite a long time. 

In 2013, affability of the records spilled by Edward Snowden, we discovered that the NSA had fruitful projects they used to pick up secondary passage access to the cameras on iPhones and Blackberries. In 2014, again cordiality of the Snowden spills, we discovered that the NSA has a large group of devices available to its to remotely screen users like "Gumfish": a malware apparatus that takes into consideration remote video observing by means of your webcam. In mid 2015, a gathering known as BlackShades was separated after it was found that the product they sold for $40 a pop had been used to give a great many buyers remote get to (counting webcam access) to casualties PCs; that is not really another trap however as old projects like Back Orifice were used in a similar manner back in the 1990s. 


It's Not Just the NSA 

We need to underline the entire "scarcely another trap" bit and the straightforwardness with which even possibly gifted noxious users can access your PC. This article over at Ars Technica, Meet The Men Who Spy On Women Through Their Webcams, is an unsettling account. The larger part of individuals doing the spying aren't government specialists, however low-level programmers that use basic devices to inventory and screen every one of the devices a PC may have admittance to. 

So before you shrug your shoulders and say, "Well the NSA couldn't care less about my exhausting life, so it doesn't make a difference," comprehend that while we may all discover assertions of government seeing the most upsetting on a worldwide and scholarly level, the greater part of genuine webcam spying is completed by unpleasant Peeping Toms. 

So the shy of it is: yes, webcam spying is a genuine danger. At the point when everybody from the spooks at the NSA to the child nearby has admittance to devices that can turn a webcam against its proprietor then the risk is honest to goodness. 

What Should I Do? 

You ought to, no inquiries asked, disable or cloud your PC's webcam. There is no justifiable reason, particularly in light of the various archived instances of webcam spying, to leave an uncertain recording device for all time open on your PC. It's so natural to do that there's no reason not to. This is what you ought to consider.


Make Sure You’re Using Antivirus

While antivirus isn’t going to detect all of these things, and won’t detect many of the latest ones that are out there, it will at least help in dealing with the possibility of infection through a link or running the wrong executable.

The problem is that if the threat is actually the college kid that offers to help people with their IT problems, they can easily whitelist a trojan so an antivirus won’t detect it. Or malware could do the same thing.

You can’t really trust that little icon that says you are secure. But it’s at least a help.


Unplug It

For desktop users with external webcams, the easiest solution is to simply unplug the USB webcam. No amount of hacking is going to magically plug an unplugged device back in.


This is the solution we use around the How-To Geek offices; we leave the webcams in their usual position atop their respective workstation monitors and then when we need to use them we plug the USB cable into an easily accessible front or top USB port on the said workstation.

It’s the most foolproof way to approach the problem if you have an external webcam, and works regardless of the hardware or operating system.

Disable It in the BIOS

If you have a laptop with an integrated webcam (or a rare all-in-one desktop model that also sports an integrated webcam), you have a few options. If your BIOS supports it, you can disable it at the BIOS level, which is ideal.

Reboot your computer and enter into the BIOS (follow the on-screen instructions to enter “SETUP”, typically by pressing the F2 key, the DEL key, or a function key combination of some sort). Look through the BIOS options for an entry labeled something like “webcam,” “integrated camera,” or “CMOS camera.” These entries will typically have a simple toggle, like enable/disable or lock/unlock. Disable or lock the hardware to turn off your webcam.

Unfortunately, the BIOS solution is relatively rare and typically found on computers from vendors with heavy institutional sales. Business Dell and Lenovo laptops, for example, commonly ship with this feature in the BIOS because their corporate buyers want the ability to disable the webcam. With other vendors (and even within computer lines from the aforementioned vendors) it’s hit or miss.

Be forewarned that disabling the webcam typically disables the microphone too, as in most laptops the camera and microphone module are on the same small expansion board. This is obviously a benefit (from a privacy standpoint) but you should be aware of it so you’re not left wondering why your mic is dead.

Disable It in the OS 

This arrangement isn't exactly as secure or idiot proof, however it's a welcome next step. You can handicap your webcam by handicapping it and evacuating driver bolster for it. 


The procedure for doing as such fluctuates from working system to working system, however the general start is the same. In Windows, you simply need to enter the Device Manager (click Start and look for "device supervisor" to discover it). There, you can find your webcam under the "Imaging Devices" class, right-click it, and pick "Disable" or "Uninstall". 

Clearly this isn't an impeccable arrangement. On the off chance that somebody has remote authoritative access to your machine they can simply, with a more noteworthy or lesser level of bother, introduce the missing drivers and empower the device once more. 

Excepting that sort of center and assurance, be that as it may, it's a basic and simple approach to disable your webcam. It is, in any case, rather badly designed in the event that you really use your incorporated webcam with any consistency. This conveys us to the following arrangement: darkening the focal point with a cover. 

Cover It Up 

A trade off between the bother of incapacitating the webcam in the BIOS or working system and abandoning it completely open all the time is applying a basic physical cover to your webcam focal point. As basic and oversimplified as it appears, it's really a truly viable strategy. You get moment visual affirmation that the focal point is disabled (you can see the cover each time you take a gander at your tablet), it's anything but difficult to evacuate, and we even experimented with some very reasonable DIY choices that keep the conceal alternative practical. 

Exhibited beneath, for reference, is the tablet we're using with no of the arrangements (business or DIY) connected. The pointer light is on the left, the webcam focal point is focus, and the microphone is on the privilege. 


Before you keep running off to get a move of channel tape, how about we gone through a portion of the more advantageous business choices. 

Eyebloc Cover (~$6) 

The Eyebloc is the top of the line and the most assessed webcam cover on Amazon. The outline is truly straightforward: it's a C-formed plastic cinch that you slip onto your portable PC (it can likewise be connected to tablets and smartphones in a comparative design). 


Doubtlessly about it, it was anything but difficult to apply, simple to expel, and as promoted it had no cement to talk about (so there was no danger of deposit). It likewise totally obstructed the webcam focal point on all devices we tried it on. All things considered, this thing is outrageously, monstrous and self-evident. As far as style we'd rank the Eyebloc straight up there with the enormous fit-over-shades you'd see around a retirement group. 


This is likewise the main device we tried that won't work extremely well for keen TVs, diversion supports, or whatever other bigger device that has a webcam-like device inherent. In case you're not appending it to a slim question like a portable PC cover or tablet, it won't work.

C-Slide (~$5) 

The C-Slide is a modest (and we do mean minor) plastic slider that you follow onto your portable workstation or tablet. The whole device is the span of a little mailing name (1.4″ x 0.5″ and a sparse 1mm or so thick). It's so minor, truth be told, that it was conveyed adhered to a bit of cardstock in a typical #10 business envelope and the outside of the envelope had "Your webcam cover request is inside!" in huge highlighted print to, probably, guarantee we didn't scrap it as garbage mail. 


Not at all like alternate arrangements in this gathering the C-Slide is expected for perpetual application to the device. You empower and disable the webcam by sliding the minor little board of plastic forward and backward to open and close the webcam much like some bigger outer webcams have a physical slider that covers the focal point when not being used. 

Regardless of our hesitations about how minor the C-Slide is, it worked great. It's slim to the point that you can undoubtedly close the portable workstation with no recognizable hole between the top and body. There were just two issues we found with the C-Slide. 


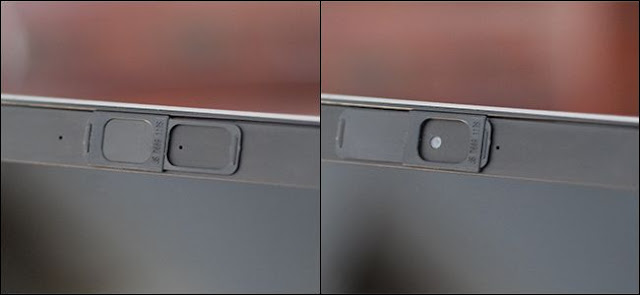
First, in the event that you have a tablet that has a bended bezel, it doesn't follow exceptionally well and will probably tumble off instantly (or not long after application). Second, you'll need to place it painstakingly with the goal that it doesn't inadvertently stick over the microphone opening on your portable PC or cover the pointer light. Second, before you peel the twofold sided tape off the back and slap it on, pause for a moment to explore different avenues regarding arrangement. Our underlying arrangement was not as much as perfect, as it obstructed the marker light and brought about a blocked microphone when the slider was open. By balancing the opening in the slider somewhat from the webcam focal point we could position the device with the end goal that the microphone wasn't darkened or taped over and the main time the pointer light was blocked was the point at which we had the slider open to use the webcam. 

Those minor issues aside, the C-Slide will deal with any camera inserted in a level surface insofar as the camera focal point is littler than the generally square centimeter opening of the slider (roughly the measure of the nail on your pinky finger). General this was our most loved arrangement. It's anything but difficult to apply and it's anything but difficult to use: no picking at somewhat sticky plate and no lost parts. 


Creative Cam Covers (~$10 for 6) 

The Creative Cam Covers feel and look fundamentally the same as cut vinyl decal sticks like those you would arrange from a sign shop or buy to peel out and stick on your auto window. The pack accompanies a liquor wipe and six dark round sticks generally the measure of a dime. They have no cement, yet rather use electricity produced via friction to stick to smooth surfaces. 


This is both an advantage (no sticky buildup and they're anything but difficult to evacuate) and a defect (they work extraordinary on smooth surfaces however not all that good on finished ones). Thusly, they work super well on portable PCs with polished piano dark bezels and tablets that have smooth glass bezels, however in the event that your tablet is brushed aluminum (like a MacBook) or simply has an unpleasant surface on the bezel, you may discover they promptly tumble off. 


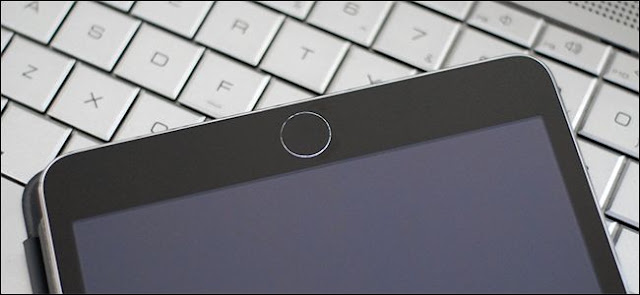
In light of that, we can just prescribe the item for those circumstances: super smooth and level portable PC bezels or glass surfaces like those found on tablets. None of our portable workstations have a gleam case and the Cam Covers would not stick (notwithstanding for a small amount of a second) to the bezel of the tablet we used for exhibition purposes in this article. They did, nonetheless, stick unfathomably well to the flawlessly smooth glass surface of our iPad small scale, as found in the photograph above. In case you're searching for a non-cement answer for a tablet or portable workstation with a gleam bezel this is an extraordinary arrangement. 

DIY Electrical Tape Covers (< $1) 

While field testing every one of these arrangements, it struck us that on the off chance that you weren't apprehensive about a modest piece of cement then the least expensive arrangement is basically punch a gap in a bit of electrical tape with an opening punch and you'd have a splendidly round little dab you could put directly over the focal point of your coordinated webcam. 

A fast excursion to the old supply wardrobe for some tape, an opening punch, and FedEx mark (to take a touch of the non-stick paper sponsorship) and we had the fixings for many webcam covers. 


The main drawback to this strategy is that, yes, you'll conceivably have somewhat cement to manage while expelling the spot (despite the fact that this is for the most part a temperature-related issue, as electrical tape doesn't have much deposit when used in cooler temperatures). It would likewise be anything but difficult to lose or damage the little dab of tape in the event that you were using it while going about, yet given that they are so shoddy to make you could without much of a stretch reserve a couple in your portable workstation pack. 

Furnished with the tips we've shared on incapacitating or covering your webcam you can without much of a stretch maintain a strategic distance from the disastrous reality of webcam snooping and decrease or altogether dispense with webcam-based protection breaks.